
Learning Android app development may seem like a scare exercise, but it can open up a nature of possibilities. You could create the next “hit app” that changes the practice we work or interact with each other. Maybe you’ll develop a tool that you can use yourself to improve your workflow. Or perhaps you’ll just amplification a new skill that estates you a very good job!
Also read: Making an app with no program experience: What are your options ?
Whatever the example, learning Android app development might not be as tough as you think, as long as you understand what all the different moving responsibilities are for, and have a roadmap to guide you through. This upright is that road map!
Step 1: Downloading the tools you need for Android app development
First, you need to create your improvement environment so that your desktop stands ready to support your Android development goals. For that, you will need Android Studio and the Android SDK. Thankfully, these both come packed together in a single download that you can find here.
Android Studio is an IDE. That stands for “integrated development environment, ” which is essentially an interface where you can enter your code( primarily Java or Kotlin) and access all the various tools necessary for development. Android Studio allows you to access libraries and APIs from the Android SDK, thereby giving you be made available to native functions of the operating system. You’ll too be able to build your app into an APK exercising Gradle, test it via a “virtual device”( emulator ), and debug your code while it runs.

With all that said, keep in mind that there are other options available for your Android app development. For lesson, Unity is a very powerful tool for cross-platform competition improvement that also supports Android. Likewise, Visual Studio with Xamarin is an excellent combination for creating cross-platform apps in C #.
We have a guide on how to create non-game apps in Unity and an introduction to Xamarin for cross platform Android development to assist you out!
Android Studio is the best place for most people to start( with Android game development being an exception ), particularly as it supplies all these additional tools and resources in a single place.
Fortunately, set up is very simple and you only need to follow along with the instructions on the screen.
If you need help getting set up, check out our Android Studio tutorial for fledglings . And our guide on how to install the Android SDK .
Step 2: Start a brand-new activity
Once you have Android Studio on your machine, the next step is to start a brand-new job. This is a straightforward process, but you’ll need to make a few decisions that will impact on your Android app development going forward.

Go to File> New> New Project. You will now be asked to select a “Project Template.” This defines the code and UI aspects that will be included in your brand-new app when it loads.
The word “Activity” refers to a “screen” in your app. Thus, a project with “No Activity” will be completely empty, apart from the basic file structure. A “Basic Activity” on the other hand will create a starting screen for your app and will contribute a button in the bottom and a hamburger menu at the top. These are common elements in many Android apps, so this can save you some time.
That said, it can also risk stirring things rather complicated when you’re firstly getting to clutches with development. For that reason, we’re going to choose the “Empty Activity.” This will create an activity and some records for us, but it won’t add a lot of added code.

Choose a list and “package name” for your new app. The reputation is what your audience will see when the app is installed on their invention. The pack list is an internal citation used by Android to differentiate it from other apps. This should be compiled employing your top rank arena( e.g . . com ), domain name, and app name.
For example: com.androidauthority.sampleapp.
If you don’t have a domain or a company, time use “com” followed by something that appeals to you!
You’ll too need to decide where you want the folders to be saved and what word you’re going to code in: Java or Kotlin.
Java vs Kotlin for Android app development
One of the biggest decisions you’ll need to make as an Android developer is whether you’re going to learn Kotlin or Java. Both expressions are officially supported by Google and Android Studio, but the government has some distinct differences.
Java has been supported by Google the longest and is what makes have been using to craft Android apps for years. Java is also one of the most in-demand programming languages in the world, which builds it a great choice for those who want to begin a vocation in developing. As the oldest Android programming language, there is also slightly more support for Java vs Kotlin, although it’s not by much.

Kotlin, on the other hand, has become Google’s preferred choice for Android development. This is the default when starting a new app, and it is likely to become more common move forward. Kotlin is also significantly easier to get to grips with if you’re a complete beginner.
For these reasons, Kotlin is probably the language of preference for Android makes that are learning for recreation, or that have not yet been desires to develop for other stages. Nonetheless, Java obliges more feel if you’re interesting in becoming a professional developer.
You can learn more about the two alternatives here by reading our leader to Kotlin vs Java for Android.
Minimum SDK
Finally, you too need to be taken into account your Minimum SDK. This is the lowest version of Android that you want your app to support.
The lower you make this number, the broader your potential audience will be. Keep in attention that there is a relatively low adoption rate for the latest versions of Android, so remaining with the latest update will prevent a lot of users from trying your creation.
![]()
Credit: Jimmy Westenberg/ Android Authority
However, you will only be able to access the latest features of Android if you target a more recent version. If you like the resound of supporting chat suds, then you’ll want to stick with the most recent version.
Step 3: Familiarize yourself with the enters
I remember the first time I tried Android app development. I laded up Android Studio and was immediately baffled by what I received. There are just so many different folders, several types of code, folders, and more! This was worlds away from the single space record I was used to working with in Python or even QBasic( anyone retain QBasic ??).
This can be rather daunting, but here’s what you need to know.

The file that is open is MainActivity.java or MainActivity.kt. This is the main logic file for the activity that is going to define how your app reacts. Look on the left, and you’ll see that this file is found in: MyApplication> app> src> prime> java> com> companyname> myapplication.
The folders abused are important for Android app development, as they facilitate Android Studio and Gradle to find everything and construct it properly( more on Gradle in a moment ). Suffice to say, you can’t precisely rename these as you please!
You’ll notice that there is already some code on the main sheet. This is what we call “boilerplate code, ” meaning that it is code that is almost identical across different app programmes and that is needed to make basic runs duty. Boilerplate code is what you’ll find yourself typing out over and over! One of the benefits of Kotlin is that it requires less boilerplate, meaning that you’ll have less code on your screen if that is what you chose.
Introducing layout folders
The role of this system is to tell Android where the affiliated layout file is. A layout folder is slightly different from a Kotlin/ Java enter. This defines the way that project activities seems, and tells you supplement things like buttons, verse, and browser windows.
You’ll find this register in: MyApplication> app> src> res> layout.
It will be called activity_main.xml. Note that registers stored in the resources folder can’t use funds; they need to use the underscore symbol to distinguish different utterances. Doubled click on this register and it will open in the main window where you edit your code. Notice that you can switch between the open enters exerting invoices along the top.

You can goal this folder via the “Code” view, the “Design” view, or a split was of the opinion that shows these windows side-by-side. There are buttons to switch state in the top right.
In the design view, you can actually drag and drop different widgets onto the screen. The code belief goes to show a laden of XML script. When you lend new widgets via the Design view, this dialogue will revise. Likewise, you can tweak qualities of the widgets( announced “views”) in here and attend them reflected in real-time via the Code view.
In the vast majority of apps, you’ll need to create a new Java/ Kotlin register and a correspond XML file, every time you miss a brand-new work. And for those that were wondering: yes, that means you have to learn either Kotlin or Java and XML. This is a bit of a headache, but it actually streamlines the process in the long run.
For getting used to XML, spoke our introduction to XML for new Android makes . Or speak this guide for more about the different views and what they each do .
The other records and folders
There are lots more registers and folders here though, so what do they all do?
In truth, you don’t need to know what everything here is. But some things that are useful to know about 😛 TAGEND
The Android Manifest: This is an XML file in the res folder that specifies important features of your app. That includes the orientation of the app, the activities that you want to be included in it, the explanation, etc.
See also: Xml: everything you need to know
Drawable: This folder is found in res. This is where you will positioned things like epitomes that you want to reference later.
Values: This source folder is a helpful neighbourhood to store appreciates that will be used globally across your app. For instance, it is possible to include colour codes( meeting it easy for you to change the gape of your part app) or fibres( terms ). You’ll define these values in individual XML files, such as colors.xml.
Gradle: Gradle is the tool that takes all your data and packets them into a workable APK for testing. It is also useful for engendering previews etc. You won’t need to worry about the records in here often, but if you want to add a “dependency, ” this is where you will do it. Reliance are external libraries that let you retrieves additional functionality from within your own code.
Of course, we also have a detailed introduction to Gradle for new Android makes.
Gradation 4: Research your app
The first thing that you are supposed to do when accustoming yourself with any new programing language, is to create an app that says “Hello World.” Thankfully, this is very easy in this case seeing as that’s what the system that’s already here does! If you look at the XML, it includes a small label that just says: Hello World!
If you look at the ascendancies along the top, you’ll hear there’s a little light-green continue arrow. On the left of this is a drop-down menu, with a phone name in it. When you installed Android Studio, this should also have installed an Android system image along with the Virtual Device Manager. In other words, you are able to once have an Android emulator set up and ready to go! By clicking on this green arrow, you’ll be able to launch that and exam your app! Notice that this will too let you use the emulated phone as if it was a real device.
You can change the settings for your virtual invention- such as screen size, Android version, opening etc.- by going to Tools> AVD Manager. You can also download brand-new organisation epitomes here. Made to ensure that your virtual machine meets or exceeds the minimum SDK you set at the start.
Alternatively, you can try plugging a physical device into your computer and using this to test your new app. You’ll need to turn on Developer Options though, and enable USB Debugging.
See too: How to enable Developer Options on your Android Device
Step 5: Make a thing!
The best behavior to learn Android app development is by doing! That means you should have a stab at editing the system in front of you, to see if you are eligible to make it do something new.
Changing the word that displays is as simple as going to get your XML and changing the line that says “Hello World! ” into “Howdy World! ”
But what if you want to add some kind of interactive ingredient to your start? In all such cases, you might decide to let the user click the button to change the text.

First, you’ll need to place this boundary inside the TextView tag in your activity_main.xml 😛 TAGEND android:id=”@+id/helloButton” android: onClick= “onHelloButtonClick”
This will give the text label the reputation “helloButton” and will state that the method “onHelloButtonClick” will reference this view. We’re going to add that to our system in a moment.
Now you can add the following code to your MainActivity. If you appreciate any textbook appear red as you are typing it, that means you need to “import” that system from the Android SDK. Click on the maroon text then press Alt+ Enter and Android Studio will do this for you automatically. In short-lived, this tells Android that you are referencing a library that is a part of the Android SDK.
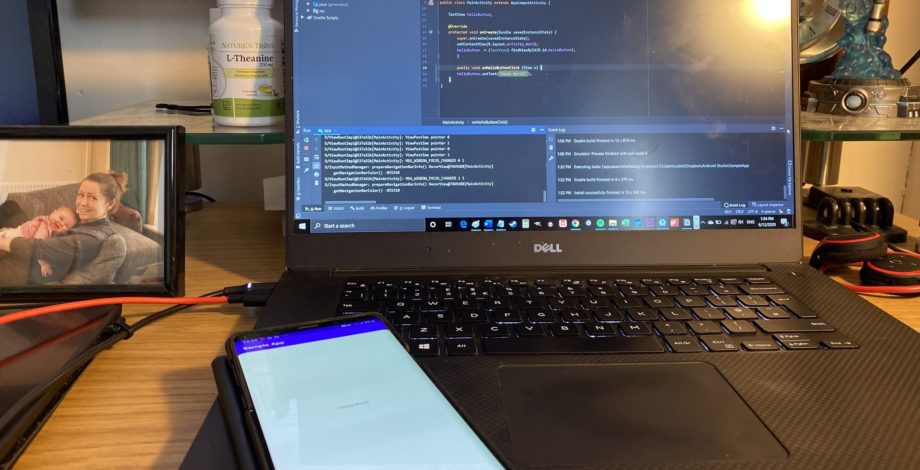
( The following speciman is entered in Java .)
public class MainActivity increases AppCompatActivity
TextView helloButton;
@Override
protected void onCreate( Bundle savedInstanceState)
super.onCreate( savedInstanceState );
setContentView( R.layout.activity_main );
helloButton=( TextView) findViewById( R.id.helloButton );
public void onHelloButtonClick( View v)
helloButton.setText( “Howdy World! ” );
In this system illustration, we first create an “object” in the code called “helloButton.” Inside our “onCreate” method( everything within the curly brackets) we then tell Android that this object represents the button in our organization document. The code you arrange here is what will run firstly when you launch an app.
Next, we organize the method that runs when someone clicks on the button. Once that happens, we can then change the verse on the said button. Notice that once again, Kotlin involves considerably lower words to achieve the same thing!
Run the app and you should now be understood that when you click the button, the textbook reforms!
This is a very simple app, but it illustrates the basics of how Android app development works. Generally, you will be creating brand-new on-screen components in the organization file, then characterizing how they behave in the affiliated Java or Kotlin file.

As you get more advanced, you’ll need to start manipulating and accumulating data. To do this, you’ll use variables that contain figures and cords( oaths ).
We have an in-depth Java tutorial that will help you get started.
Once you’ve read through that, you’ll have a basic intuition of how Java cultivates, and all that is left is to learn how you can apply these abilities to Android app development. To that tip, a great policy is to picking research projects and then work on that.
And wouldn’t you know it: we have a ton of immense projects to try out! Like an easy first assignment for Android app development noobs( math sport ).
The key is not to try and learn “all of Android app development” but to set your views on a realistic first programme. You’ll save learning as you compute brand-new features and want to do new things, and having a goal will keep your ascertain fun and organized. Before you know it, you’ll be a pro!
Read more: androidauthority.com


Recent Comments