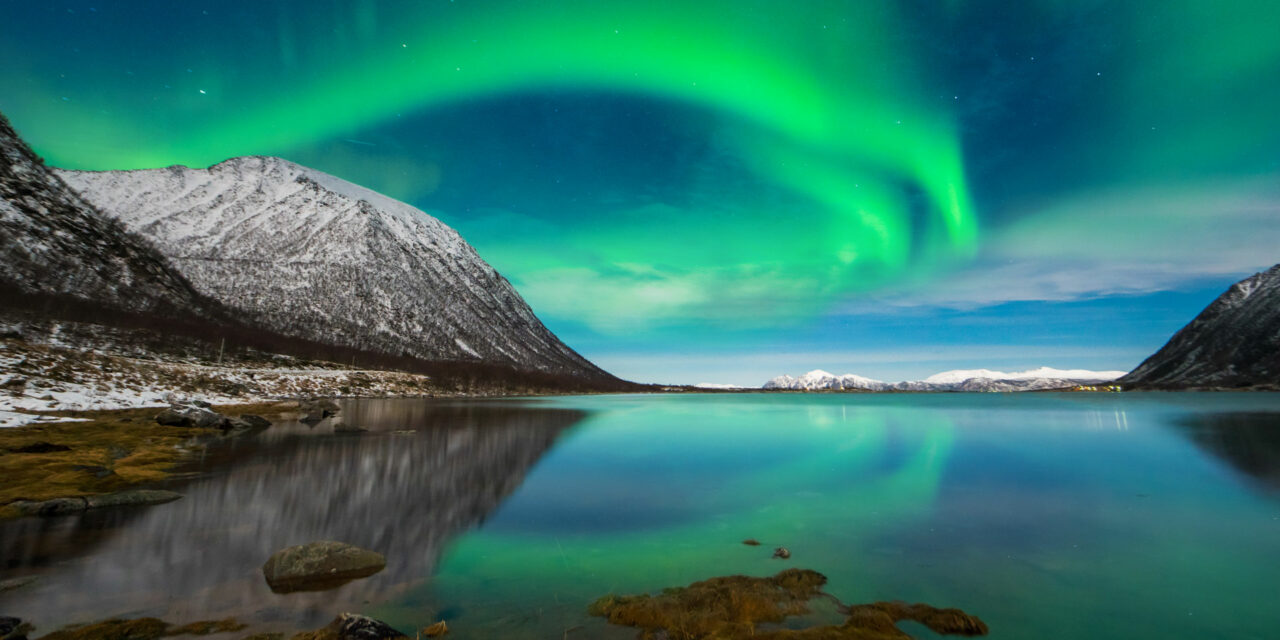
The northern lights, otherwise known as aurora borealis, are the winter-time spectacle that identifies northern skies fitted with incredible dancing brightness. Caused by the interaction of photons stimulating the gas molecules in Earth’s atmosphere, they can appear as dark-green, pink, or blue. Photographing them is near the top of almost all photographers’ wish lists, but coming a good shot is decidedly difficult.
The earth’s magnetic field forms poles in the north and south, but seeing that most of the Antarctic is uninhabited, I’ll be discussing the northern lights exclusively now, but the same principles can be applied to the southern lights( aurora australis) should be used find yourself down there.
As a photographer who’s been lucky enough to photograph them more periods than I be able to count, I’ve traveled around the world in search of this holy grail of astrophotography. Of route, there’s a certain amount of luck involved as it’s incredibly difficult to pinpoint when and where the northern lights will expose, but there’s also a great deal of formulation you can do to ensure you maximize your chances of getting a photo. I’ll be taking you through this prep and pointing out some key fragments of pack you’ll need before setting off. Plus, I’ll also discuss the best camera locations to use for northern lights photography. So let’s take a look at how to find them.
Examine for Clear, Dark Sky
First off, if you think you’re going to capture the northern lights from an humid country, thoughts again. The best sites are around or inside the arctic circle. That sees countries such as Iceland, Northern Norway, Sweden, Finland, Canada, Greenland, Russia and USA ideal. Although, when there’s an intense solar storm it has been known to be seen as far south as the Caribbean( check out the Carrington event of 1859) but that’s a uncommon occurrence.
Track the climate. Use a forecasting service such as the MetOffice, or Accuweather to find when clear skies are expected in your opt spot. It won’t matter how strong the aurora is if there’s a bank of cloud covering it up.
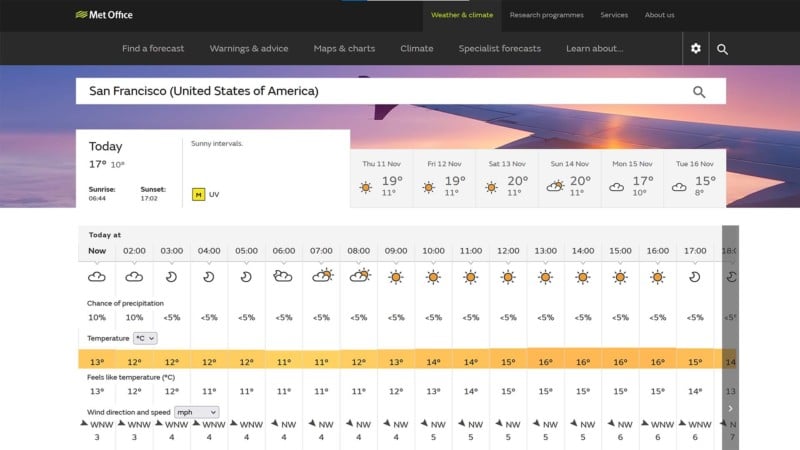 Checking the weather forecast before heading out to shoot could save a wasted expedition.
Map out the darkest skies by using a site like Dark Site Finder or tour the International Dark-Sky Association to avoid locates with glowing pollution. Generally though, the closer “youre looking to” a built up area or metropoli, the more glowing pollution will occlude your views. When “youve had” clear skies look for the aurora due north. A thin party of light-green is quite common in the countries of the north but can be seen all over when there’s a good display.
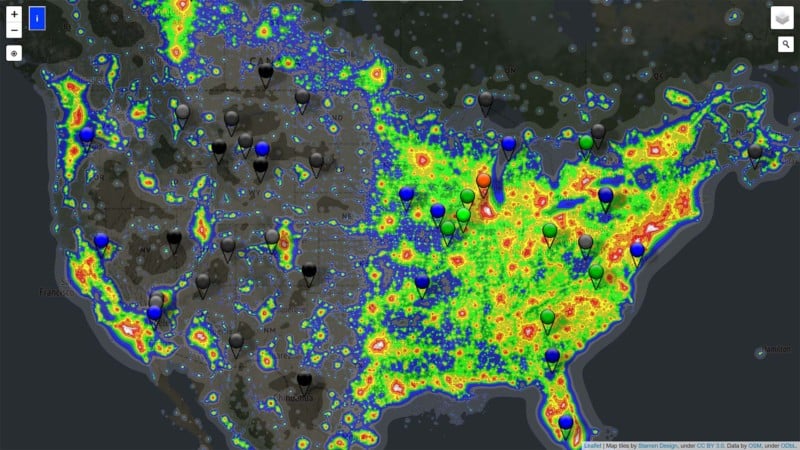 Avoid light pollution from nearby towns and municipals for a clearer view of the northern lights.
Keep your thumb on the solar pulsate. Download an aurora forecasting app such as My Aurora Forecast( iOS or Android) which can tell you the Kp strength of expected auroras and make notifications on when you should head out to shoot. Alternatively, use the Space Weather Prediction Center for short-term calculates and aurora mannequins. There are also some dedicated aurora tracking Twitter notes that tweet when there’s a likelihood of ending aurora.
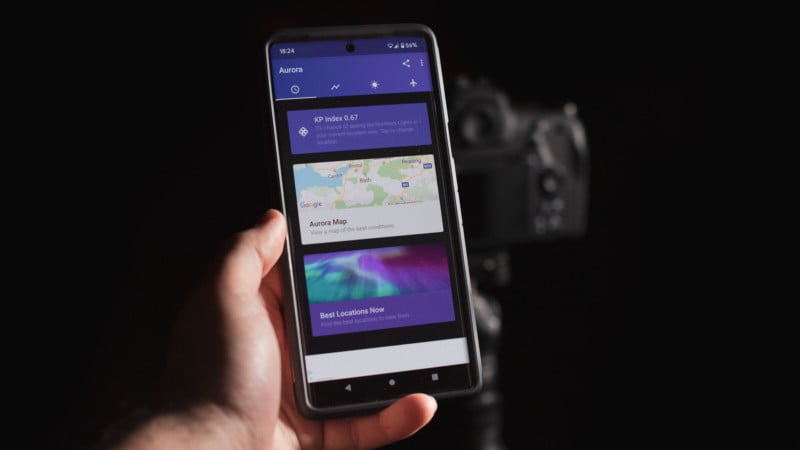 Tracking the northern lights on your smartphone is a quick and easy method of staying well understood auroral activity. Bringing the Right Gear
Once you’ve ascertained the right spot and represented sure skies are clear, you’re ready to start shooting. But there are some crucial slice of pack that you’ll need before you can capture the dancing lights.
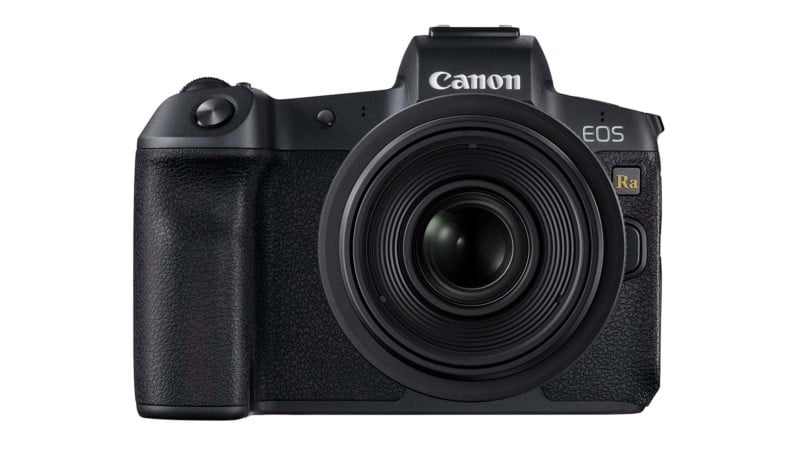
Due to the cold northern climes, you’ll need to wrap up warm. A hat, gloves, and boots are essential when standing out in cold temperatures and recollect to layer up. A DSLR or mirrorless camera capable of shooting at high-pitched ISO sensitivities with negligible portrait noise is imperative. Generally, large image sensors are better. Especially ones that don’t have too many pixels, because higher megapixel sensors can feed more image racket. Look for full-frame image sensors, or cameras specifically designed for astrophotography such as the Canon Ra.
 Astrophotography-specific cameras work by minimizing noise and maximizing sun input. A lens with a wide maximum aperture is useful for maximizing the illuminate coming into the camera. Aim for f/ 2.8 or wider, but beware of shooting extremely wide due to visual issues such as softness in the edges of the frame and heavy vignetting. Wide-angle lenses are often used because people want to capture a wide vista with the aurora dancing overhead in the sky. Wide-zooms with wide constant holes are model because they offer the ability to recompose places without having to move the camera.
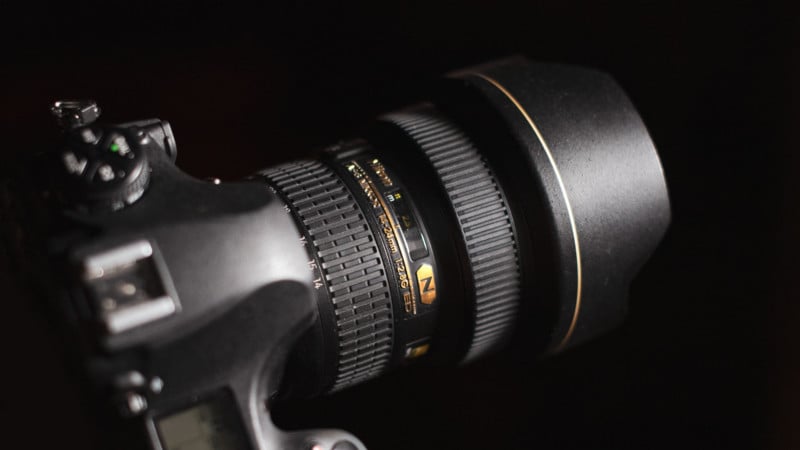 Wide-angle zooms are excellent for shooting a wide field of view and allow quick recomposition without moving. A sturdy tripod is a must. Check the warhead for the kit you aim to shoot on and try not to exceed it. A good ball-head is imperative too, as you can compose the panorama in any tendency or orientation quickly and you can shoot straight up into the sky.
Supplementaries That Help But Aren’t As Essential
There are a few portions of equipment that they are able impel photographing the northern lights much easier, but you can get away without them. Think of it more as a schedule for those who’ll head out routinely during the winter months to capture the northern lights.
An external screen liberation is good. Shooting the aurora you’ll be using long revelation occasions so you need to trigger the camera without touching it or gamble camera shake blur. Wired exhausts are cheaper but wireless are better because there’s literally no physical connection with the camera and so you bypassed camera shake much better.
These daytimes, countless DSLR and mirrorless cameras have internal intervalometers allowing for multiple images to be taken in succession without the need to re-press the shutter liberate. But for camera patterns that don’t have this facet you can get an intervalometer release like the Hahnel Captur with built-in timers and interlude settles, even locates for seasoned long revelations.
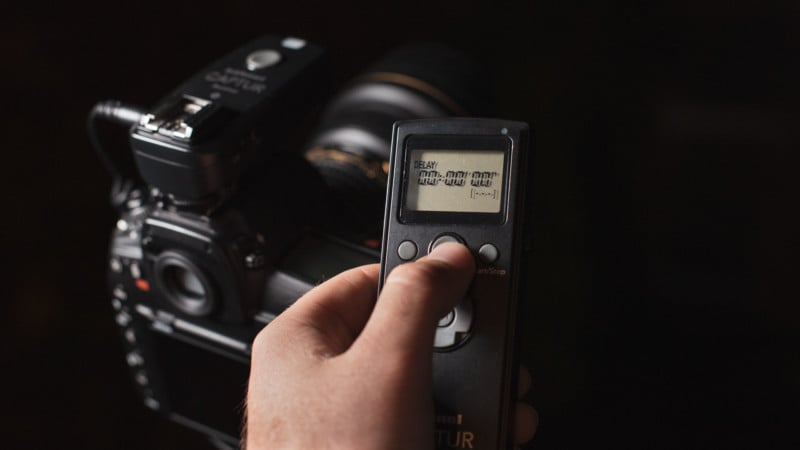 External shutter freeings help to minimize camera shake during long exposures, impeding likeness abrupt.
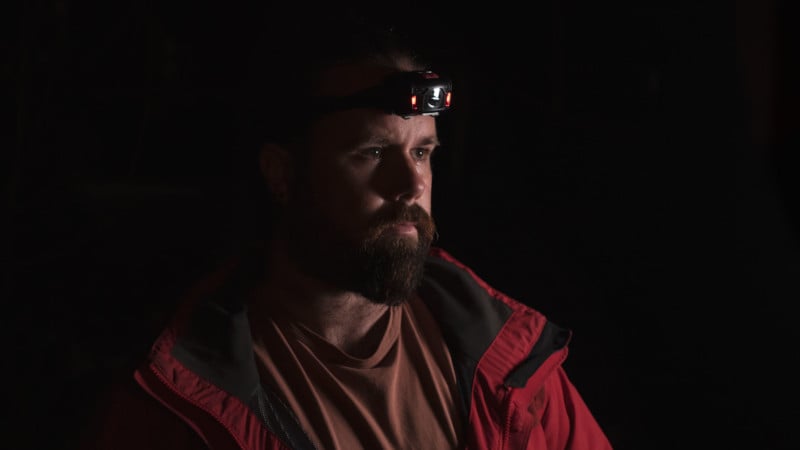
When moving glass from warmer to colder modes( such as taking your gear from the members of this house outside, or get it out of the car) it has a tendency to fog up due to condensation. Fortunately, you can invest in a lens warmer that sits around the barrel of the lens to keep it heated and bypassed shadowing. This is especially useful during long shoots. A heading kindle( or ability lamp) allows for hands-free use of your camera package. Look for a psyche flashlight that ejects red light- this lower wavelength light will stop your night vision much less than white-hot light, allowing you to see in the dark better.
 Red light is a lower wavelength visible light and retains scotopic vision.
Cameras with visual viewfinders, like DSLRs, might need a viewfinder cover-up. Ambient light can enroll the visual viewfinder and skew metering and exposure of shots, so a encompas can remove this trouble. Some cameras, such as the Nikon D8 50, have this built-in.
 Optical viewfinders should be fitted with a viewfinder cover to prevent incidental sunrise registering the camera How to Focus In the Dark
Typically, autofocus struggles to work in the dark, and will hunt back and forth and usually end up giving you a blurry photo. That’s why it’s important to take control and use manual concentrate proficiencies to ensure everything is tack-sharp.
First off, engage live end and sought for a light perform or miscarrying that, a distant lighting. Zoom in on the screen and button the lens or organization to manual focus. Rotate the focus ring until the light-colored or ace is as tiny and pin-sharp as possible. I often find that point, go past it slightly, and drawing it back. I might rock back and forth on the focus ring a few seasons until I’m absolutely sure it’s as sharp-worded as is gonna be. Alternatively, if you’re shooting astrophotography on longer focal segments or telescopes the best direction to attain good focus is by using an astrophotography mask, like a Bahtinov mask. These masks play more like a lens filter and sit on the breast ingredient of your lens( or telescope if you’re applying one ). It has a gridded array that produces a starburst impression which, when fully focused, aligns across a superstar perfectly.
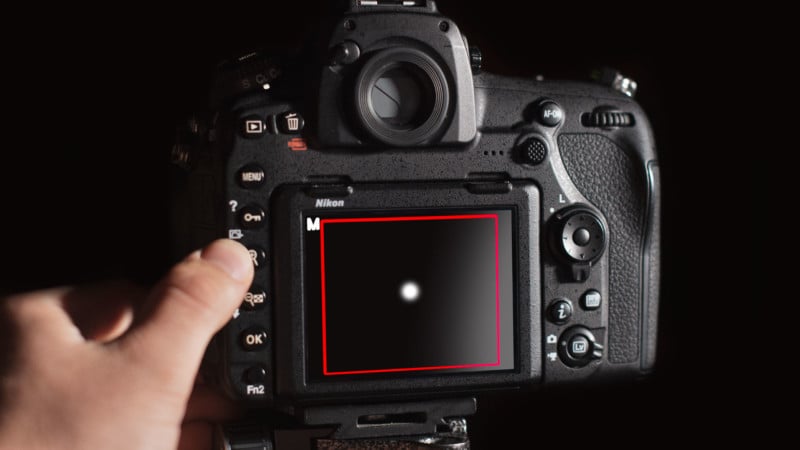 Zoom in on the rear screen and focus the lens manually. Ideal gives for capturing the northern lights
Below are some top camera provides gratuities for when you head out shooting the northern lights next. But be aware that light milieu and sky darkness influence the optimum creates for your particular photoshoot. As a make, these are just starting points and you’ll need to adjust them accordingly.
Place the camera on a tripod and compile your place via the viewfinder or live end screen. Then sharpens up as above. The opening should be set as open as is practicable: for example, f/ 2.8. ISO should be between 1000 -4 000 depending on the brightness of the aurora and the foreground. Shutter speed should be between 1-15 seconds. Any longer than this and you risk blurring the aurora as it dances through the sky. The portion of exposure truly depends on how defined the aurora display is, and whether it’s moving much in the sky. More explanation and change necessitates shorter show periods to capture it. Release the shutter with an external shutter exhaust if possible, but if that isn’t an option use an showing postpone procedure, or a self-timer.
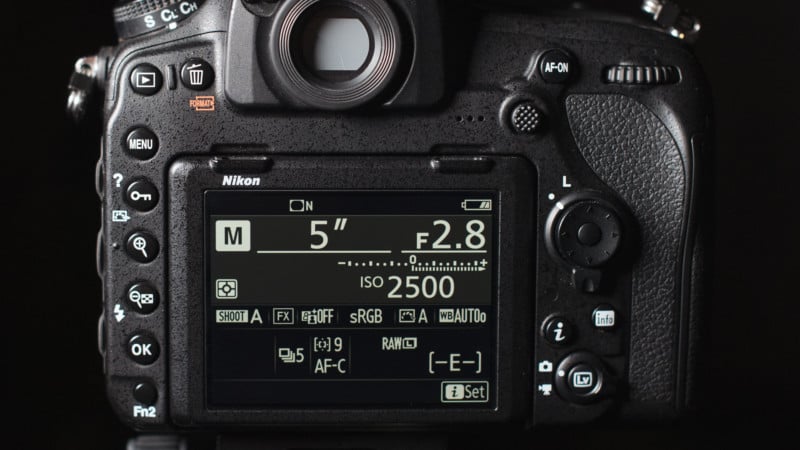 Although camera fits with vary from light to night, generally you’ll want a wide aperture, long shutter fast, and high-pitched ISO. Tip-off For Composition
Shooting a hundred photographs of the sky may well record some northern lights, but without sufficient framework, it constructs for dim viewing. That’s why it’s important to use some compositional framework to compose your shots.
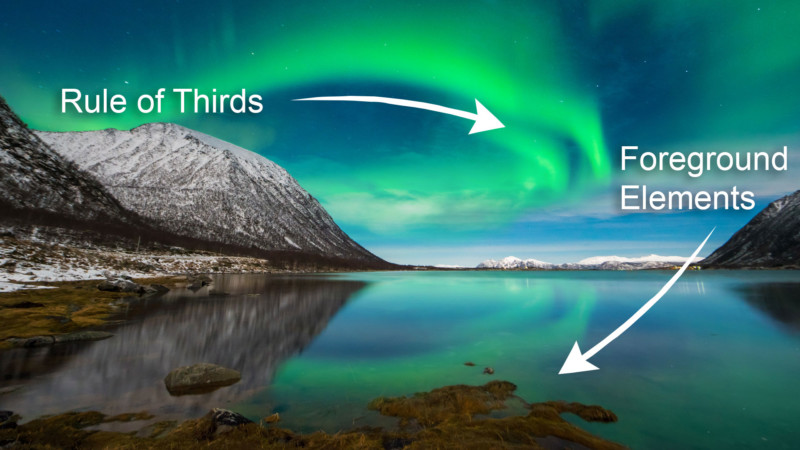
Try to settle something in the foreground that computes context to the scene. For instance, a gloom sequence of boreal forest in the lower third of the make would image locating but also tolerate enough space in the frame to display the aurora perfectly. Experiment with vertical and horizontal directions. Peculiarly if the northern lights wander in one particular direction( either straight-shooting overhead, or parallel with the foot ). If in doubt, use the rule of thirds to split the sky and landscape up into manageable regions. Try to target subjects of particular interest( such as trees in the foreground, or the best part of the aurora) along the intersections.
 Try to foresee the kind of photo you crave first, before lead out
Read more: petapixel.com


Recent Comments